Wednesday, November 26, 2014

The One!

This is the sensor that works the best! Its the Original Microstream OF05ZAT in Blue!

The RED One is FAKE!

This one (in blue) has 2174 Pulses per Liter and is accurate as hell! In the Picture you can see the fake red one. Its quite larger than the original but useless!


Saturday, September 6, 2014

Sensor Calibration

Hello again. I know its been a while, however I was enjoying my long vacations :)
Since I managed to make my BT Fuel manager work with all sensors, I had to calibrate them because for most the datasheet was crap!! So here it is, well an old version of it I think. Don't even know if it is the working one since my device is installed on my boat.

How it works:

The counters start from 0 in the Serial Console.
Connect the sensors and pass a litre of water (gasoline is better, but stick to water) through the sensor.
I did this by connecting a fuel hose to a bottle which hat exactly one liter in it.
After all the water has passed trough the sensor , notice the number of Pulses it registered. Thats your pulses per liter!

Easy!


//******************************************************
//     BT Fuel Manager Sensor Calibration Arduino
//               sketch by MaleBuffy
//                21/6/2014
//******************************************************
//
//     Pin D4 for +5V for the Sensor 1
//     Pin D6 for GND for the Sensor 1
//     Pin D2 for Sensor 1 cable
//     Pin D3 for Sensor 2 cable
//     Pin D4 for +5V for the Sensor 2
//     Pin D6 for GND for the Sensor 2


#include <SoftwareSerial.h> // import the Arduino serial library 

volatile float PulseSensor=0; // Measuring the pulse from the sensor 1
volatile float PulseSensor2=0;// Measuring the pulse from the sensor 2

int hall = 2;    // Sensor 1 Pin should be connected to Pin 2 of the Arduino
int hall2 = 3;   // Sensor 2 Pin should be connected to Pin 3 of the Arduino


void incementpulse ()     //This is the function that incements the pulse counter. PulseSensor 1
{
  PulseSensor++;  // Equals PulseSensor = PulseSensor + 1
}

void incementpulse2 ()     //This is the function that incements the pulse counter. PulseSensor 2
{
  PulseSensor2++;  // Equals PulseSensor = PulseSensor + 1
}


// Begin of Code. Setting pins up.

void setup()
{

  pinMode(hall, INPUT); // Init Pin 2 to receive data from the Sensor
  digitalWrite(hall, HIGH); // Using Internal Pull up resistor to pin 2

  pinMode(hall2, INPUT); // Init Pin 3 to receive data from the Sensor
  digitalWrite(hall2, HIGH); // Using Internal Pull up resistor to pin 3


  pinMode(4, OUTPUT); // Initializes digital pin 4 as an OUTPUT
  digitalWrite(4, HIGH); // 5V to pin 4 (Flow Sensor)
  pinMode(6, OUTPUT); // Initializes digital pin 6 as an OUTPUT
  digitalWrite(6, LOW); // GND to pin 6 (Flow Sensor)
 

  attachInterrupt(0, incementpulse, RISING); // attaching the interupt
  attachInterrupt(1, incementpulse2, RISING); // attaching the interupt
  sei();      // Enabling interrupts

 Serial.begin(9600);
}


// Loop measuring pulses from Sensor

void loop ()  
{

  Serial.print("PulseSensor: ");
  Serial.println(PulseSensor);

  Serial.print("PulseSensor2: ");
  Serial.println(PulseSensor2);


}

Tuesday, July 15, 2014

Accuracy!

As you may habe noticed, the display on the Android app has an accuracy of 0,001 liters/sec. That translates to 3,6 liters/hour. So the consumption increases every 3,6 liters/hour which is a resolution that doesn't really make sense, since the system is capable of higher resolutions. So I have edited the Arduino sketches so that it sends a 4 decimal float number, instead of a 3 decimal one. The resolution is now 0,36 liters/hour.

In order for the Android app to work with the new code, I have made some changes in the code.

Change:

  BTFuel.println(literspersecond+literspersecond2,3); // Sends liters per second to Bluetooth 

to 

  BTFuel.println(literspersecond+literspersecond2,4); // Sends liters per second to Bluetooth 


I have pdated the initial code and the links to the apps.

Here is the link again (Adds don't work but that is on purpose) 

Sunday, June 8, 2014

Troubleshooting

I have tested the sensor on my boat today.

To make a long story short, its working but...it seems like the sensor cannot keep up with the fuel flow the motor needs.

Everything went perfectly smooth. Arduino code works, Android Application working but after a minute in WOT, the motor started to loose power.

After checking the balloon (don't know the term in English) it seemed like something caused it to shrink in.

I am going to try the 13mm OD sensor that I have received last week to see if that's the problem.

Here is a video of the app working!


Thursday, May 29, 2014

Theoretically speaking...(Update: Tested and working)

A friend asked me to make him a BT Fuel Manager for his twin Yamaha Setup. He has 2 tanks that feed each outboard, so he needed 2 sensors and a bit of coding to make this work with the Android apps. Since he isn't into learning Processing from scratch, he asked me to help him with the software part and show him how to do the hardware part.

Like the title says, this hasn't been tested, but should work. What it does is, it uses a second interrupt on Pin 3, where the second sensor is connected, and triggers exactly the same function to count pulses. Now this could have been done in two ways.

1. We could just attach an interrupt to pin 3 and call the same increment function called "incrementpulse".
2. We could use 2 seperate increment values and functions and add that at the end when sending data to the Apps

I have chosen the second way for a simple reason: You can use 2 diffrenet sensors, that have a diffrenet count per liter value. For instance 2000 pulses per liter on the first one and a 2500 pulses per liter on the second one.

Here is the code in theory:

UPDATE 1/6/2014: I have connected two flow sensors and tested the application. It is working and gets data from both sensors. We still haven't tested it on the boat but everything looks promising. The best part is that even if you plan to use one flow sensor, you can use this Sketch as it works also with one sensor connected!


//******************************************************
//     BT Fuel Manager Arduino sketch by MaleBuffy
//            for Double 2 Stroke Outboard
//         and BT Fuel Manager / BT Fuel Gauge
//                21/4/2014
//******************************************************
//
//     Pin 9 of Arduino to RX on the HC-05
//     Pin 11 of Arduino to TX on the HC-05
//     Pin 3v3 for +3.3V for the HC-05
//     Pin Gnd for Ground for the HC-05
//     Pin D4 for +5V for the Sensor 1
//     Pin D6 for GND for the Sensor 1
//     Pin D2 for Sensor 1 cable
//     Pin D3 for Sensor 2 cable   
//     Pin D4 for +5V for the Sensor 2
//     Pin D6 for GND for the Sensor 2
#include <JeeLib.h> // The Library used to put Arduino to sleep ISR(WDT_vect) { Sleepy::watchdogEvent(); } // Enable Watchdog for Sleeping purposes #include <SoftwareSerial.h>// import the Arduino serial library SoftwareSerial BTFuel(11, 9); // Define the Pins of the HC-05 Bluetooth device. RX, TX volatile float PulseSensor; // Measuring the pulse from the sensor 1 volatile float PulseSensor2;// Measuring the pulse from the sensor 2 float literspersecond; // Its the liters per second of sensor 1 float literspersecond2; // Its the liters per second of sensor 1 int hall = 2; // Sensor 1 Pin should be connected to Pin 2 of the Arduino int hall2 = 3; // Sensor 2 Pin should be connected to Pin 3 of the Arduino int pulses = 1818 ; // Define Sensor 1 Pulse per Liter for 2500 FCH-M-POM-LC 6 MM / 950 for FCH-midi-POM / 1818 for FS-3400AH int pulses2 = 1818 ; // Define Sensor 2 Pulse per Liter for 2500 FCH-M-POM-LC 6 MM / 950 for FCH-midi-POM / 2000 for FS-3400AH / void incementpulse () //This is the function that incements the pulse counter. PulseSensor 1 { PulseSensor++; // Equals PulseSensor = PulseSensor + 1 } void incementpulse2 () //This is the function that incements the pulse counter. PulseSensor 2 { PulseSensor2++; // Equals PulseSensor = PulseSensor + 1 } // Begin of Code. Setting pins up. void setup() { pinMode(hall, INPUT); // Init Pin 2 to receive data from the Sensor digitalWrite(hall, HIGH); // Using Internal Pull up resistor to pin 2 pinMode(hall2, INPUT); // Init Pin 3 to receive data from the Sensor digitalWrite(hall2, HIGH); // Using Internal Pull up resistor to pin 3 pinMode(4, OUTPUT); // Initializes digital pin 4 as an OUTPUT digitalWrite(4, HIGH); // 5V to pin 4 (Flow Sensor) pinMode(6, OUTPUT); // Initializes digital pin 6 as an OUTPUT digitalWrite(6, LOW); // GND to pin 6 (Flow Sensor) BTFuel.begin(9600); // Initiate serial connection to Bluetooth device attachInterrupt(0, incementpulse, RISING); // attaching the interupt attachInterrupt(1, incementpulse2, RISING); // attaching the interupt } // Loop measuring pulses from Sensor void loop () { PulseSensor = 0; // Resetting PulseSensor PulseSensor2 = 0; // Resetting PulseSensor 2 sei(); // Enabling interrupts delay (1000); // Delay 1 second (1000 milliseconds) cli(); // Disabling interrupts literspersecond = (PulseSensor/pulses); // Flowsensor used, makes X Pulses ever Liter. literspersecond2 = (PulseSensor2/pulses2); // Flowsensor used, makes X Pulses ever Liter. BTFuel.println(literspersecond+literspersecond2,4); // Sends liters per second to Bluetooth if (PulseSensor == 0 && PulseSensor2 == 0) { // If no input comes from the Sensor, put the Arduino to Sleep enterSleep(); } } // Function to put Arduino to sleep void enterSleep() { Sleepy::powerDown(); }

Saturday, May 24, 2014

Saving battery life...

A Fuel Flow Managing System is all about measuring Fuel economy. That's easy to understand. So it would only make sense if the Fuel Manager would need the least possible energy for doing its job. Thats what I did.

JeeLib is a Arduino (not only) Library that can put a Arduino (ATMEGA) into sleep, consuming the least amount of energy. You can install it buy downloading from GitHub here and putting the folder (rename it as JeeLib) into the Arduino "libraries" folder.

I modified the sketch to take a measurement for one second and then go to sleep until the sensor picks up a pulse again. It would really make sense of course, when using a Barebone Arduino, that hasn't got the USB intercafe etc. that also consumes energy. 

Here is the updated code with the JeeLib part.

//******************************************************
//     BT Fuel Manager Arduino sketch by MaleBuffy
//            for Single 2 Stroke Outboard
//         and BT Fuel Manager / BT Fuel Gauge
//                24/5/2014
//******************************************************
//
//     Pin 9 of Arduino to RX on the HC-05
//     Pin 11 of Arduino to TX on the HC-05
//     Pin 3v3 for +3.3V for the HC-05
//     Pin Gnd for Ground for the HC-05
//     Pin D4 for +5V for the Sensor
//     Pin D6 for GND for the Sensor
//     Pin D2 for Sensor cable


#include <JeeLib.h> // The Library used to put Arduino to sleep
ISR(WDT_vect) { Sleepy::watchdogEvent(); }  // Enable Watchdog for Sleeping purposes
#include <SoftwareSerial.h> // import the Arduino serial library 
SoftwareSerial BTFuel(11, 9); // Define the Pins of the HC-05 Bluetooth device. RX, TX 
volatile float PulseSensor; // Measuring the pulse from the sensor
float literspersecond;  // Holds the Serial output to the BT Device. Its the liters per second
int hall = 2;    // Sensor Pin should be connected to Pin 2 of the Arduino
int pulses = 2000 ; // Define Sensor Pulse per Liter for 2500 FCH-M-POM-LC 6 MM / 950 for FCH-midi-POM / 2000 for FS-3400AH

void incementpulse ()     //This is the function that incements the pulse counter. PulseSensor
  PulseSensor++;  // Equals PulseSensor = PulseSensor + 1

// Begin of Code. Setting pins up.

void setup() 
  pinMode(hall, INPUT); // Init Pin 2 to receive data from the Sensor
  digitalWrite(hall, HIGH); // Using Internal Pull up resistor to pin 2
  pinMode(4, OUTPUT); // Initializes digital pin 4 as an OUTPUT 
  digitalWrite(4, HIGH); // 5V to pin 4 (Flow Sensor)
  pinMode(6, OUTPUT); // Initializes digital pin 6 as an OUTPUT 
  digitalWrite(6, LOW); // GND to pin 6 (Flow Sensor)
   
  BTFuel.begin(9600); // Initiate serial connection to Bluetooth device
  attachInterrupt(0, incementpulse, RISING); // attaching the interupt


// Loop measuring pulses from Sensor

void loop ()    
{

  PulseSensor = 0;   // Resetting PulseSensor 
  sei();      // Enabling interrupts
  delay (1000);   // Delay 1 second (1000 milliseconds)
  cli();      // Disabling interrupts

  literspersecond = (PulseSensor/pulses); // Flowsensor used, makes X Pulses ever Liter. 
  BTFuel.println(literspersecond,4); // Sends liters per second to Bluetooth 

  if (PulseSensor == 0) {         // If no input comes from the Sensor, put the Arduino to Sleep
   enterSleep();
  }
}

// Function to put Arduino to sleep
void enterSleep()
{
 Sleepy::powerDown();
}

Wednesday, May 14, 2014

Sensor crazy...

UPDATE: DO NOT BUY!!! Its a cheap copy that has only 180 Pulses per Liter! Useless! The original is in BLUE colour!

Well it seems like I am becoming a sensor addict. I have bought so many sensors, that I forgot all about the Microstream one. Although purchased a while ago, it hasen't arrived yet (From China of course).

It costs about EUR 17, which is less than the BIO-Tech ones and a bit more than the one from Futurlec. It has however, a good accuracy of 0.5% which when true, is awesome. Its probably more on the 2% side, but thats also super awesome.

Pulse rate 0.46mL/p


Friday, May 9, 2014

The sensors explained

Although I haven't tested the project on my boat yet (damn you Chinese waterproof case), I am going to tell you a little bit why I decided to test my project with the FS-3400AH aka FLOWFUEL30L0.

Thing is, I started with the FCH-M-POM-LC 6 MM fom BIO-TECH. This was used in another flowscan project, however for a smaller outboard (40 HP). The "problem" is that although the flow rates it can handle are suitable for engines like my Tohatsu M140A2, I am afraid that the 3mm nozzle is just too small. This has been confirmed with the person that used this flow sensor on the 40HP outboard. 


Since I was still coding for the Arduino and Android, I was searching for a better suitable flow sensor. I contacted BIO-Tech and they suggested I should use the FCH-midi-POM which has a 6mm nozzle. That would fit OK, but at the Price of about EUR 42, it wass too expensive for what I had in mind. I ordered one just in case, however.


So back to the drawing board, I managed to find another sensor that probably fits my needs. At first, the downside was the it supports flow rates from 1L/Hour to 60L/Hour. My engine burns 54L/Hour at WOT. I ordered it since I thought that I wanted to measure fuel flow at cruising speed and not WOT. The good part however is that, buy blowing into the sensor I managed to get readings for over 60L/Hour. Air is different from liquid for sure, but since this is the only 6mm nozzle sensor I have received, I will do the tests with this one. So my priorities are:


1. FS-3400AH
2. FCH-midi-POM
3. FCH-M-POM-LC 6 MM (probably not going to test it at all)

Saturday, May 3, 2014

Redesigning for testing phase

Since I am still in the testing phase of my BT Fuel Manager, I have decided that connecting it to the 12V battey of the Boat is not a good idea. Once I have everything finished, it would make sense.

So i have used a 9V battery connector and connected it to Vin and Gnd of the Arduino, in order to power it from the battery. OK, there is no on/off switch but that is no problem for now. It is temporary anyways.

Here is a picture of the connector.


Sunday, April 27, 2014

BT Fuel Manager/Gauge [no solder]

DISCLAIMER: This Project involves components that are attached to the fuel line. Fuel is explosive and you have to be very careful when modifying such parts of your boat. Please do so at your own risk.

I bought a used RIB Boat this year, a Scanner 590 with a TOHATSU 140 HP 2-Stroke Outboard. Since prices of gasoline are quite high where I live (1,60-165 Euros per Liter), I was looking to buy a Flowscan to measure my Fuel consumption. Well these babies start from 250 Euros and up. That is a lot of Fuel to burn. So I decided that I would make my own.

Since I dont have enough room in the console like you see in the Image below, I realised that I had to find another way to display my data. Something that didn't involve making holes in my new (used) boat. You guessed it. I am going to use my Bluetooth capable phone and an Android application.


So lets start with the project. We are going to make a Bluetooth Fuel Manager aka Flowscan for my TOHATSU 140 HP 2-Stroke Outboard.

The components


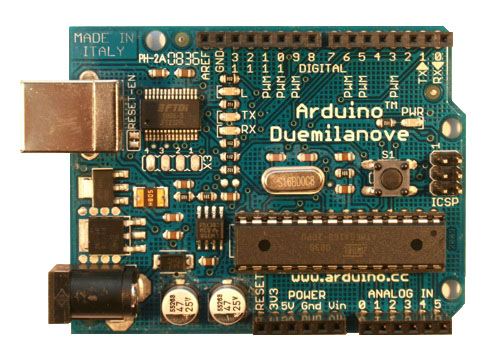
  • An Arduino Board. I am using an Arduino Duemilanove from an old project. Buy one here. Cost: about $13.79 or EUR 9,95

  • A HC-05 Bluetooth module. Buy one here Cost: about $6.99 or EUR 5.04


  • A Waterproof enclosure from here. Cost about $6.00 or EUR 4,33


    • A Waterproof DC/DC Converter 12V Step down to 9V 3A 15W Power supply from here. Cost: about $4.80 or EUR 3,46. This will be used after testing for final installation.


        • A 3-clone cable for the Sensor
        • A 2-clone Power cable for Powering the Arduino from the battery (or any other way you like)
        • A 4-pin JST connector and cable (can be 6-pin when you want to be able to reprogramm your HC-05)
        • Some screw terminal blocks (I use 5 double terminal blocks)

        The Software (Arduino Sketch)


        So in order for our Arduino to start behaving and reading/sending data as we want, we have to programm it first to do stuff. Go to the Arduino site by clicking here and download the Arduino IDE for your Operating system. Installation is pretty straight forward, so no problems here. 

        Connect your board via USB, run the Arduino IDE  and wait for for it to recognize your board. If it doesnt, then select it manually from the Tools menu.

        Copy and paste the following code and send it to the Arduino.


        //******************************************************
        //     BT Fuel Manager Arduino sketch by MaleBuffy
        //            for Single 2 Stroke Outboard
        //         and BT Fuel Manager / BT Fuel Gauge
        //                21/4/2014
        //******************************************************
        //
        //     Pin 9 of Arduino to RX on the HC-05
        //     Pin 11 of Arduino to TX on the HC-05
        //     Pin 3v3 for +3.3V for the HC-05
        //     Pin Gnd for Ground for the HC-05
        //     Pin D4 for +5V for the Sensor
        //     Pin D6 for GND for the Sensor
        //     Pin D2 for Sensor cable


        #include <SoftwareSerial.h> // import the Arduino serial library 
        SoftwareSerial BTFuel(11, 9); // Define the Pins of the HC-05 Bluetooth device. RX, TX

        volatile float PulseSensor; // Measuring the pulse from the sensor
        float literspersecond;  // Holds the Serial output to the BT Device. Its the liters per second
        int hall = 2;    // Sensor Pin should be connected to Pin 2 of the Arduino
        int pulses = 1818; // // Define Sensor Pulse per Liter for 2500 FCH-M-POM-LC 6 MM / 950 for FCH-midi-POM / 1818 for FS-3400AH

        void incementpulse ()     //This is the function that incements the pulse counter. PulseSensor
        {
          PulseSensor++;  // Equals PulseSensor = PulseSensor + 1
        }

        // Begin of Code. Setting pins up.

        void setup()
        {
          pinMode(hall, INPUT); // Init Pin 2 to receive data from the Sensor
          digitalWrite(hall, HIGH); // Using Internal Pull up resistor to pin 2
          pinMode(4, OUTPUT); // Initializes digital pin 4 as an OUTPUT
          digitalWrite(4, HIGH); // 5V to pin 4 (Flow Sensor)
          pinMode(6, OUTPUT); // Initializes digital pin 6 as an OUTPUT
          digitalWrite(6, LOW); // GND to pin 6 (Flow Sensor)

          BTFuel.begin(9600); // Initiate serial connection to Bluetooth device
          attachInterrupt(0, incementpulse, RISING); // attaching the interupt
        }


        // Loop measuring pulses from Sensor

        void loop ()  
        {
          PulseSensor = 0;   // Resetting PulseSensor
          sei();      // Enabling interrupts
          delay (1000);   // Delay 1 second (1000 milliseconds)
          cli();      // Disabling interrupts
          literspersecond = (PulseSensor/pulses); // Flowsensor used, makes X Pulses ever Liter.
          BTFuel.println(literspersecond,4); // Sends liters per second to Bluetooth

        }

        Final code with twin outboard setup option here

        Connecting the sensors and Bluetooth module


        If you notice, there are some comments in the first part of the code. 


        //     Pin 11,9 RX TX on the HC-05
        //     Pin 3v3 for +3.3V for the HC-05
        //     Pin Gnd for Ground for the HC-05
        //     Pin 4 for +5V for the Sensor
        //     Pin 6 for GND for the Sensor
        //     Pin 2 for Sensor cable

        It tells you how you have to connect each sensor to the board.


        Preparing the Arduino

        Here is the Arduino without anything connected. You can also see the terminals that are going to be connected to the Arduino female headers.


        We are first going to use the 2 terminal block with the 4 connectors and put them in the Pins 3v3, Gnd, Vin and A0 (A0 is not used)


        The HC-05


        Although the HC-05 Module has 6 Pins, we only use the 4. The other two are when you want to name your HC-05 something else, or change baudrates and stuff. We don't need to do that but you can anytime. We are using a JST 4-pin cable assembly to make things easy.


        We connect the RX   pin of the HC-05 to Pin  9 of the Arduino.
                           the TX    pin of the HC-05 to Pin 11 of the Arduino.
                           the VCC pin of the HC-05 to the 3v3 Pin of the Arduino.
           and finally the GND pin of the HC-05 to the GND Pin of the Arduino.


        The Flow Sensor


        Our flow sensor has 3 pins. 2 for Power (V+ and Gnd) and one for the Pulse. The one I am using sends 2500 Pulses/every liter. By counting the Pulses it sends in 1 second, we know the consumtion of Fuel at any given moment.


        We connect the +V   pin of the sensor to Pin D4 of the Arduino.
                            the  Gnd pin of the sensor to Pin D6 of the Arduino.
                     and the Pulse pin of the sensor to |Pin D2 of the Arduino.


        Powering the Arduino with the 2 core cable


        Since I am going to use my BT Flow Manager on my boat, I have to find a way to power it. I could use a 9V battery, but the device will go to a place that is not easy to reach. So I want to power it from one of the two 12V batteries. I advise you not to connect it directly to the battery, but use a 12V Regulator of some sorts.


        We connect the +V cable to the Vin Pin of the Arduino.
                     and the Gnd cable to the Gnd Pin of the Arduino (which already has a black cable stuck in).

        +V goes to the Positive Pole of the Battery and the Gnd goes to, u guessed it, the negative pole.

        The result schould be something like this. Ugly huh! Don't worry. Its going to be pretty once it gets into that Waterproof case (which I am still waiting to come from China...)


        Now that we have everything connected, lets get to the Android part.


        The Android Application(s)

        I have made two applications, that basicaly do the same thing. They display Speed in mph, in knots and the fuel consumption data. I firstly thought I make it simple with just numbers etc.


        However, I soon realised that it is not as fun as a real gauge. So I made an artificial one. By touching the screen you change the type of fuel consumption displayed.


        You can download both apps from BTFuelMan.rar.
        Changed hosting site from Zippyshare to Google Drive.


        Saturday, April 26, 2014

        First post!

        Well its about time I create my blog of "Things I am doing" which you guessed it. Its mostly "Technology stuff". I am using computers and programm software since I was 10, which was 27 years ago. I really like doing stuff that have to do with technology, computers and gadgets.

        I have made several things, like Arduino Projects (DIY Segway and other stuff) ,reverse engineered software and my latest project I am working on is an Arduino based Bluetooth Fuel Manager for my 2 stroke TOHATSU 140 HP Outboard, that communicates with Android. This was also the main reason for creating this Blog.

        Well at the time of writing this post, I already have the Sketch ready. I also have the application ready and guess what. I am going to explain and show you, how you can do your own. So stay tunned (I know I am talking to myself right now, however I hope it will change at some point of time).